



How to run Meta ads for a Shopify store
Run Meta ads for a Shopify store on a small budget: check you are ready, connect the store with Shopify's free Facebook & Instagram app and a test order, launch one Sales campaign locked to 10 times what an order leaves over 14 days, turn off losing ads daily, and raise 20% or stop every Sunday on Shopify's orders.
ByDinesh BypillaReviewed byMurali SidLast checked 22 min read
Your Shopify store has a few orders, and you want to run Meta ads to get more. Most first tries go the same way: a boosted post or a $10-a-day campaign, likes and clicks, maybe one sale, and a Meta number that does not match Shopify. This guide shows how to run Meta ads for a Shopify store on a small budget: check you are ready, connect the store properly, run one locked 14-day test, and judge it on the orders Shopify shows.
Do these three things
About 4 hours to set up, then about 1 hour 15 minutes a day and 30 minutes every Sunday. Judge each test when it has spent its whole limit, not after 2 days.
Show the three actions in fullHide the full list
- Today: check your store passes the three tests for ads: 10 reviews, 1 order per 100 visits from strangers, and one video people shared. If it does, connect it to Meta with Shopify's free Facebook & Instagram app, and place one real order that shows in Meta as one purchase.
- Every day: compare each ad's spend with its orders in Shopify. Turn off any ad that has spent 3 times your break-even cost with no order. Make 4 new ad versions, so a spare is always ready. AI drafts the words; you film the product.
- Every Sunday: divide what the test spent by the orders Shopify shows from your ads. When the 14 days end, run the next test 20% bigger if each order cost at or under your break-even cost. If not, stop and fix the store.
Get help doing these
ChatGPT or Claude reads this guide and works through it with you.
1. Check your store is ready for Meta ads and set your test numbers
Meta ads work for a new store only when strangers already buy without them. Check three things in Shopify, then turn what one order leaves you into four numbers: a test limit, a daily budget, a stop line and a click check.
An ad sends more strangers to your store, and you pay for each one. If strangers who find you for free do not buy, paid strangers will not buy either. So the three tests are about what already happened without ads. They are the same three as in how to market a D2C brand:
- At least 10 reviews on your product pages.
- At least 1 order for every 100 visits from people who do not know you, a conversion rate of 1%. In Shopify, open Analytics and compare sessions with orders, leaving out orders from friends and family. Shopify changed how it counts sessions on 21 to 23 September 2026: it now leaves out bots, so use only weeks after that date.
- One video people shared or commented on without being paid. This becomes your first ad creative.
If any answer is no, your Meta budget is $0 today, and that is the right answer. Put the hours into the free work that gets you to yes: 100 personal messages a day to people you know and then to small creators, and 2 short videos a day on Instagram and 2 on TikTok. The full routine is in how to get customers online for free. ChatGPT or Claude drafts each message in about a minute; you add one line that is true about the person.
If every answer is yes, fill in your numbers. Your break-even cost is what one usual order leaves after product, packing, shipping, payment fees and returns: the most you can pay an ad for one order, your break-even customer acquisition cost. How much to spend on ads explains each rule.
Price of a usual order: $[price]
Break-even cost per order (what one order leaves): $[X]
Break-even ROAS: $[price] ÷ $[X] = [number]
Test limit (X × 10, and never more than money you can lose): $[limit]
Daily budget (limit ÷ 14): $[limit ÷ 14]
Stop line for one ad (X × 3): $[X × 3]
Click check: 100 clicks × $0.60 = $60. Is the limit bigger? [yes / no]
The click check tells you whether the test buys enough visits to learn anything. In LocaliQ's 2026 benchmarks, a Facebook traffic ad click cost $0.60 on average: $0.50 for beauty and personal care, $0.71 for clothing. If your limit buys fewer than 100 clicks, keep ads at $0 and raise what each order leaves first: a higher price or a bigger order.
- Tool: Shopify Analytics, Google Sheets, and ChatGPT or Claude to build the sheet. Check every number it uses against an invoice or a Shopify report.
- Time: 30 minutes.
- You will have: a yes or no for each test, and your four numbers in one sheet.
- It worked if: every line holds a real number from Shopify or an invoice, and none says "about".
- Common mistake: boosting a post for $20 "to see what happens". It buys likes from strangers, not orders, and tells you nothing. The other mistake is using the price instead of what one order leaves: a $49 order that leaves $22 can only pay $22 for an ad sale.
See it done: Ferns & Rinse's test numbers, once all three tests are true
Ferns & Rinse is a made-up plant-based haircare brand with its own Shopify store. It sells one shampoo and one conditioner at $28 each, or both for $49.
The Meta test
| Line | Amount |
|---|---|
| 10 reviews · 1 order per 100 visits from strangers · 1 shared video | all yes |
| Price of the pair | $49 |
| Break-even cost per order | $22.73 |
| Break-even ROAS ($49 ÷ $22.73) | 2.2 |
| Test limit (× 10), under the $400 they put aside | $227 |
| Daily budget ($227 ÷ 14) | about $16 |
| Stop line for one ad (× 3) | $68 |
| Click check: 100 clicks at $0.50 | $50, so the limit passes |
Why it works: Every number comes from one real order and money they can lose, so they know when to stop before they spend $1.
2. Connect Shopify to Meta with the free Facebook and Instagram app
Connect your store to Meta with Shopify's own Facebook & Instagram app, and set its data sharing to Maximum. This one app adds the Meta pixel and the Conversions API, the two parts of conversion tracking on Meta, so Meta sees each order even when a shopper's browser blocks tracking.
The app is free on every Shopify plan, as long as Meta accepts your store. Before you start, check that you have full control of your Facebook Page and of the Meta business portfolio that owns it. You will need both.
- 1
Add the app
In Shopify, open Settings, then Sales channels, then Shopify App Store. Search for Facebook, and click Add channel or Add app. Click Start set up, then Connect account, and sign in to Facebook.
- 2
Connect your Meta assets
Choose your business portfolio, your Facebook Page, your ad account and your Meta pixel. If you have no pixel, the app makes one. Connect your Instagram account when it asks. Accept the terms and click Finish setup.
- 3
Set data sharing to Maximum
In Shopify, open Sales channels, then Facebook & Instagram, then Settings, then Data sharing settings. Turn on Customer data sharing, and under Choose level pick Maximum. Standard uses the pixel alone, and ad blockers can stop it. Enhanced and Maximum add the Conversions API, which sends each order from Shopify's server.
- 4
Match the time zone and currency
In Meta Ads Manager, open Payment settings and check, under Business info, that your ad account uses your store's time zone and currency. New ad accounts start on Pacific time. Changing either later closes the ad account and makes a new one, so fix it now, before your first campaign, or each day's orders will not line up with each day's spend.
- 5
Add one line to your privacy policy
Shopify says it is your job to tell customers what you share with Meta. Add a sentence to your privacy policy, or use Shopify's free privacy policy generator.
- Tool: Shopify's Facebook & Instagram app and Meta Business Suite. Both are free.
- Time: 45 minutes.
- You will have: your store connected to one pixel, with Maximum data sharing, and an ad account in your time zone and currency.
- It worked if: the app's Data sharing settings show Maximum and a connected pixel, and Ads Manager shows your time zone and currency.
- Common mistake: two pixels. If an old theme, a freelancer or another app also added Meta's code, each order is counted twice, and Meta shows more purchases than you had. Remove every other Meta pixel so only the app sends them. If the app says your website "can't be used", your myshopify.com address is linked to another business portfolio: remove it there, then try again.
3. Place a real test order and check the Meta pixel sees one purchase
Before you spend $1, buy your own product through a tagged link and check that Meta records exactly one purchase with the right value, and that Shopify shows where the order came from. Then cancel and refund it.
Ad tracking breaks quietly. The usual faults are a missing purchase, a purchase counted twice, or a purchase with the wrong value, and you only find them by testing. Store owners in a July 2026 Shopify Community thread put a normal gap between Meta and Shopify at about 5 to 10%. A gap of 20 to 30% usually means a second pixel or a broken Conversions API.
- Add UTM parameters, short tags that tell Shopify where a visit came from, to one product link: yourstore.com/products/[product]?utm_source=facebook&utm_medium=paid_social&utm_campaign=test
- In Chrome, add Meta Ads Data Advisor, Meta's free extension, which used to be called Meta Pixel Helper. It shows each pixel event as it fires.
- Open the tagged link and buy the product with a real card. Shopify's test payment mode does not count as a real order in reports, so use a real payment and refund it after. Your payment provider may keep a small fee.
- In Meta Events Manager, open your pixel and look at the Overview. Within about 20 minutes you should see one Purchase, with both Browser and Server under Connection method, and the value of your order.
- In Shopify, open the order. Under Conversion summary, click View conversion details. The visit should show utm_source=facebook. Shopify says these details can take up to 48 hours.
- Cancel and refund the order.
This is the short version of setting up conversion tracking. Also add a "Where did you hear about us?" question to your checkout or thank-you page. This is self-reported attribution: the customer's own answer, which catches people who saw an ad and came back later by typing your name.
- Tool: Meta Events Manager, Meta Ads Data Advisor (free) and your Shopify admin.
- Time: 30 minutes, plus the refund.
- You will have: proof that one order reaches Meta once, with the right value, and that Shopify knows it came from Facebook.
- It worked if: Events Manager shows 1 Purchase, not 2, at the right value, and the Shopify order shows the facebook tag.
- Common mistake: launching first and fixing tracking "later". Meta's system learns who buys from these purchase events, so every dollar spent before they work is spent blind.
4. Make 10 ads from what already sold, then 4 more every day
Turn the video people shared and the words from your best reviews into 10 ad versions. Launch the best 3 and keep 7 as spares. Then make 4 new versions every day, so a fresh ad is ready whenever one fails.
Meta's system now picks, person by person, which ad each person sees. So different ads reach different kinds of buyer, and copies of one ad do not. Start with what already sold for free: the video people shared, and lines from your reviews and DMs. Give these to ChatGPT or Claude, which can draft content like this in minutes, and ask for 10 versions of the first line, or of the first 2 seconds of the video, each from a different reason to buy. How to make ad creatives covers finding those reasons, and your value proposition gives the one promise each ad makes. To see what works in your category, search your rivals in Meta's free Ad Library, as in a competitor analysis.
Ad name: [angle]-[image or video]-[number], for example label-video-1
First 2 seconds or first line: [a buyer's own words from a review or DM]
Promise: [one result, in plain words, from your value proposition]
Proof: [one true fact: a review, a number of buyers, a guarantee]
Button: Shop now
Make each ad in Meta's sizes: 4:5 (1440 × 1800 pixels) for images in the feed, and 9:16 (1440 × 2560) for videos in Reels and Stories. On a 9:16 video, keep the top 14%, the bottom 35% and 6% on each side free of text, because the app's buttons cover them. Add captions. Film your real product: user-generated content from real customers works too, because it is social proof. Since 1 June 2026, Meta shows an "AI info" label in "About this ad" when it detects an ad made with AI tools, so let AI draft words and backgrounds, never a "customer" who does not exist.
Before you upload, open "Advantage+ creative enhancements" in each ad and turn off any change you do not want, such as added music or rewritten text. Some are on by default, and they can switch back on when you copy an ad.
Then keep the spares coming. Every day, make 4 new versions (2 images and 2 videos) from a new reason to buy, and post the 2 videos as Reels on Instagram and on Facebook for free. That is 2 posts a day on each. The ones people stop for, share or comment on are your next spares. Instagram post ideas for D2C brands has formats to rotate. Meta's own advice is that too many ads at once means each one shows less often, so keep 3 live in the test and the rest in the bank. Spread the volume over the days instead of making fewer. Testing Facebook ad creatives covers testing them once you have more budget.
- Tool: your phone, a free editor such as CapCut or Canva, and ChatGPT or Claude to draft.
- Time: 2 hours for the first 10, then about 1 hour a day for 4 new versions.
- You will have: 3 ads ready to launch, 7 spares, and 28 new versions a week.
- It worked if: every ad opens with a buyer's own words or the product in use, and it reads on your phone with nothing under the app's buttons.
- Common mistake: 10 copies of one idea in different colours. Meta matches each ad to people one by one, so copies of one idea reach the same kind of buyer. The other mistake is waiting for a polished brand film instead of filming the product in use on your phone today.
See it done: Ferns & Rinse's first 3 ads
3 live, 7 spares
| Ad name | Format | First 2 seconds or first line |
|---|---|---|
| label-video-1 | 9:16 video, the Reel people shared | "I couldn't read one word on my shampoo label." |
| softday2-image-1 | 4:5 image, curls on day two | "Soft on day two, not heavy." |
| gym-video-1 | 9:16 video, washed after a run | "Plant-based, and it still cleans after the gym." |
| 7 spares | 4 images, 3 videos | from the angles "Instead of" and "What our first buyers said" |
Why it works: Each ad starts from something a buyer actually wrote, and each one is a different kind of ad, so each can reach a different person.
5. Set up one Sales campaign in Meta Ads Manager with a lifetime budget
In Meta Ads Manager, make one Sales campaign that aims for purchases on your website, with one ad set, your 3 ads, a lifetime budget equal to your test limit and an end date 14 days away. Then set an account spending limit, so the account cannot spend more than the test, whatever happens.
Meta has changed this screen since 2025. You no longer choose between "Manual" and "Advantage+" first. Advantage+ is switched on by default for Sales campaigns: Meta picks the audience, the placements and how the budget moves. That is fine for a small test. Your job is to set the few things that matter.
- 1
Campaign
Click Create and choose Sales. Name it with no spaces, such as test1-oct. Under budget, use the campaign budget (Advantage+ campaign budget) and choose Lifetime budget. Enter your test limit. A lifetime budget is the most the campaign can spend over its whole run; Meta may spend more on some days and less on others, but not more in total.
- 2
Ad set
Set the conversion location to Website and the conversion event to Purchase, using the pixel from step 2. Set the start date to tomorrow and the end date 14 days later. Under audience, leave Advantage+ audience on and set only the location: the countries you ship to. Location, minimum age, language and excluded audiences are the hard limits Meta keeps to; anything else you add is only a suggestion. Leave placements on Advantage+.
- 3
Ads
Add your 3 ads from step 4, using your Facebook Page and Instagram account. Set the website URL to your best-selling product page, not your home page. It is your landing page for the test. Under Tracking, paste the UTM parameters below, so each order shows which ad brought it.
- 4
Account spending limit
In Payment settings, set an account spending limit equal to your test limit. When the account reaches it, every ad pauses, and the limit does not reset by itself. Accounts on manual payments cannot use it; for those, the lifetime budget is your only cap.
utm_source=facebook&utm_medium=paid_social&utm_campaign={{campaign.name}}&utm_content={{ad.name}}Meta reviews new ads before they run, usually within 24 hours. Leave the attribution setting as it is: you will judge the test on Shopify's orders, not on Meta's count. Leave retargeting ads for later. At a few hundred visits a month, there are too few visitors to show them to.
- Tool: Meta Ads Manager (free; you pay only for the ads).
- Time: 45 minutes.
- You will have: one live campaign with one ad set and 3 ads, which cannot spend more than your test limit.
- It worked if: the campaign shows a lifetime budget equal to your limit, an end date 14 days after the start, Purchase as the conversion event, and the account spending limit in Payment settings.
- Common mistake: choosing Traffic or boosting a post because the pixel is new. Meta then finds people who click, not people who buy. A July 2026 Shopify Community thread shows the result: 25 to 30 visits and 0 sales. Choose Purchase from day one. The other mistake is three ad sets at $5 a day each. None gets enough spend to learn anything, so keep one.
See it done: Ferns & Rinse's campaign, as entered
test1-oct
| Setting | What they chose |
|---|---|
| Objective | Sales |
| Budget | Lifetime, $227, on the campaign |
| Conversion | Website · Purchase |
| Dates | 14 days, ends at midnight on day 14 |
| Audience | Advantage+ on, location: United States |
| Ads | label-video-1, softday2-image-1, gym-video-1 |
| Link | the $49 pair's product page, with the URL parameters |
| Account spending limit | $227 |
Why it works: Every setting either locks the spend or lets them count orders in Shopify, ad by ad.
6. Check every ad each day and turn off the ones past your stop line
Every day, at the same time, write down each ad's spend from Ads Manager and its orders in Shopify. Turn off any ad that has spent 3 times your break-even cost with no order in Shopify, and put a spare in its place.
To find each ad's orders, open each new order in Shopify, click View conversion details under Conversion summary, and read the utm_content tag: it is the ad's name. At 1 to 3 orders a day, that takes 5 minutes. Shopify can take up to 48 hours to show the details, so check yesterday's orders again too. Then:
- Turn off any ad that has spent 3 times your break-even cost and has 0 orders in Shopify. Put in the best spare from step 4.
- Leave everything else alone. Do not change the budget, the audience or the dates during the 14 days. Meta says changes like pausing the ad set or changing its audience or creative can restart its learning. So turning off a losing ad and adding a spare are the only changes you make. On a test this small, that restart costs you little.
- Expect "Learning limited". Meta shows it when an ad set is unlikely to get about 50 purchases in the week after its last big edit. A small test cannot buy 50 orders a week. Meta says this is not a penalty, so judge the test on Shopify instead.
Meta's own purchase count will not match Shopify. Meta counts a purchase when someone buys within its time window after seeing or clicking an ad, and since a change that began in March 2026 it counts only link clicks as clicks. Shopify counts every real order. Use Meta for spend, CPM, cost per click and click-through rate; use Shopify for orders.
- Tool: Meta Ads Manager, your Shopify orders and Google Sheets.
- Time: 15 minutes a day.
- You will have: one row per ad for each day of the test.
- It worked if: no ad is still running past the stop line with 0 orders in Shopify.
- Common mistake: judging by clicks or by Meta's purchase column. An ad with cheap clicks and no orders in Shopify is still losing money. The other mistake is raising the budget on day 3 because one order came in.
7. Every Sunday, count orders in Shopify and raise 20% or stop
Every Sunday, write one row for the test in your ad budget sheet: what Meta says it spent, the orders Shopify shows from it, and the cost per order. When the test has spent its whole limit, decide: run the next one 20% bigger if each order cost at or under your break-even cost, or stop if it cost more.
For the week's orders, open Shopify Analytics, then Reports, and choose the Marketing category. The "Sales attributed to marketing" report shows sales with their UTM campaign name, so filter it to your campaign and count the orders. Take spend from Ads Manager, because Shopify's Growth page does not show Meta's costs.
Week | Test | Spent (Ads Manager) | Orders in Shopify from the ads | Purchases Meta claims | Cost per order (spent ÷ Shopify orders) | Break-even cost | Shopify ROAS (sales ÷ spent) | Decision
When a test has spent its whole limit:
- Cost per order at or under your break-even cost: duplicate the campaign with a lifetime budget 20% higher and a new 14-day end date. Raise the account spending limit by the same amount. Keep the ads that sold and add your best spares. Keep raising 20% per test while the cost stays at or under your number.
- Cost per order over your break-even cost: stop. Put the money back into the free work from step 1. Then find where shoppers drop out with why ads get clicks but no sales: the product page, the trust signals, the shipping cost at checkout or abandoned carts.
- No orders at all: go back to step 3 and test an order again. If tracking works, the store or the offer is the problem: read why no one is buying.
Paste the week's numbers into ChatGPT or Claude and ask it to fill the sheet and apply the rules. Check its sums against Shopify. Once you have 50 orders a month, set up Klaviyo flows and work on repeat purchases, so buyers from ads come back without another ad. Once a month, step back for a marketing review.
- Tool: Google Sheets, Shopify Analytics and Meta Ads Manager.
- Time: 30 minutes every Sunday.
- You will have: one row a week, and a raise or stop decision for every test that has spent its limit.
- It worked if: every order you count from Meta is an order you can find in Shopify with the facebook tag.
- Common mistake: raising the budget because Meta shows a good ROAS. Check Shopify's orders against your break-even ROAS first.
See it done: Ferns & Rinse after the $227 test
Test 1, 14 days
| Spent | Orders in Shopify from the ads | Purchases Meta claims | Cost per order | Shopify ROAS | Decision |
|---|---|---|---|---|---|
| $227 | 11 | 14 | $20.64 | 2.4 (over 2.2) | next test $272, about $19.40 a day |
Why it works: They count orders in Shopify, not Meta's number, and each order cost less than the $22.73 it leaves, so they raise by 20% and no more.
When Meta pays back test after test, choose your next channel with the same numbers. For a second paid channel, compare Google Shopping and Performance Max, after listing your products on Google for free. If you also sell on Amazon, use the same break-even cost for Amazon ads. Your ecommerce marketing budget shows how ads fit next to creators and email.
Where Scout7 helps
Scout7 speeds up three of the seven steps: 4, 5 and 6. Campaigns run in the Scout7 app, not from a chat with Claude or ChatGPT yet.
Step 4. Scout7's Video Studio writes a script, films it scene by scene with the cast and voice you choose, and adds captions, in portrait 9:16. Image Studio makes image posts with captions in your brand's voice. You direct the scenes, reshoot what misses and approve the cut. Use your real product in every one.
Step 5. Scout7 connects your Meta ad account and drafts the campaign with an audience, an estimated reach and a budget you set. It builds the creatives and ad sets and walks the campaign through creative review, targeting and budget, including whether the budget is daily or lifetime. Choose lifetime and enter your test limit. You review every creative and approve the spend. Nothing launches without your approval. The account spending limit and the URL parameters are still set in Meta.
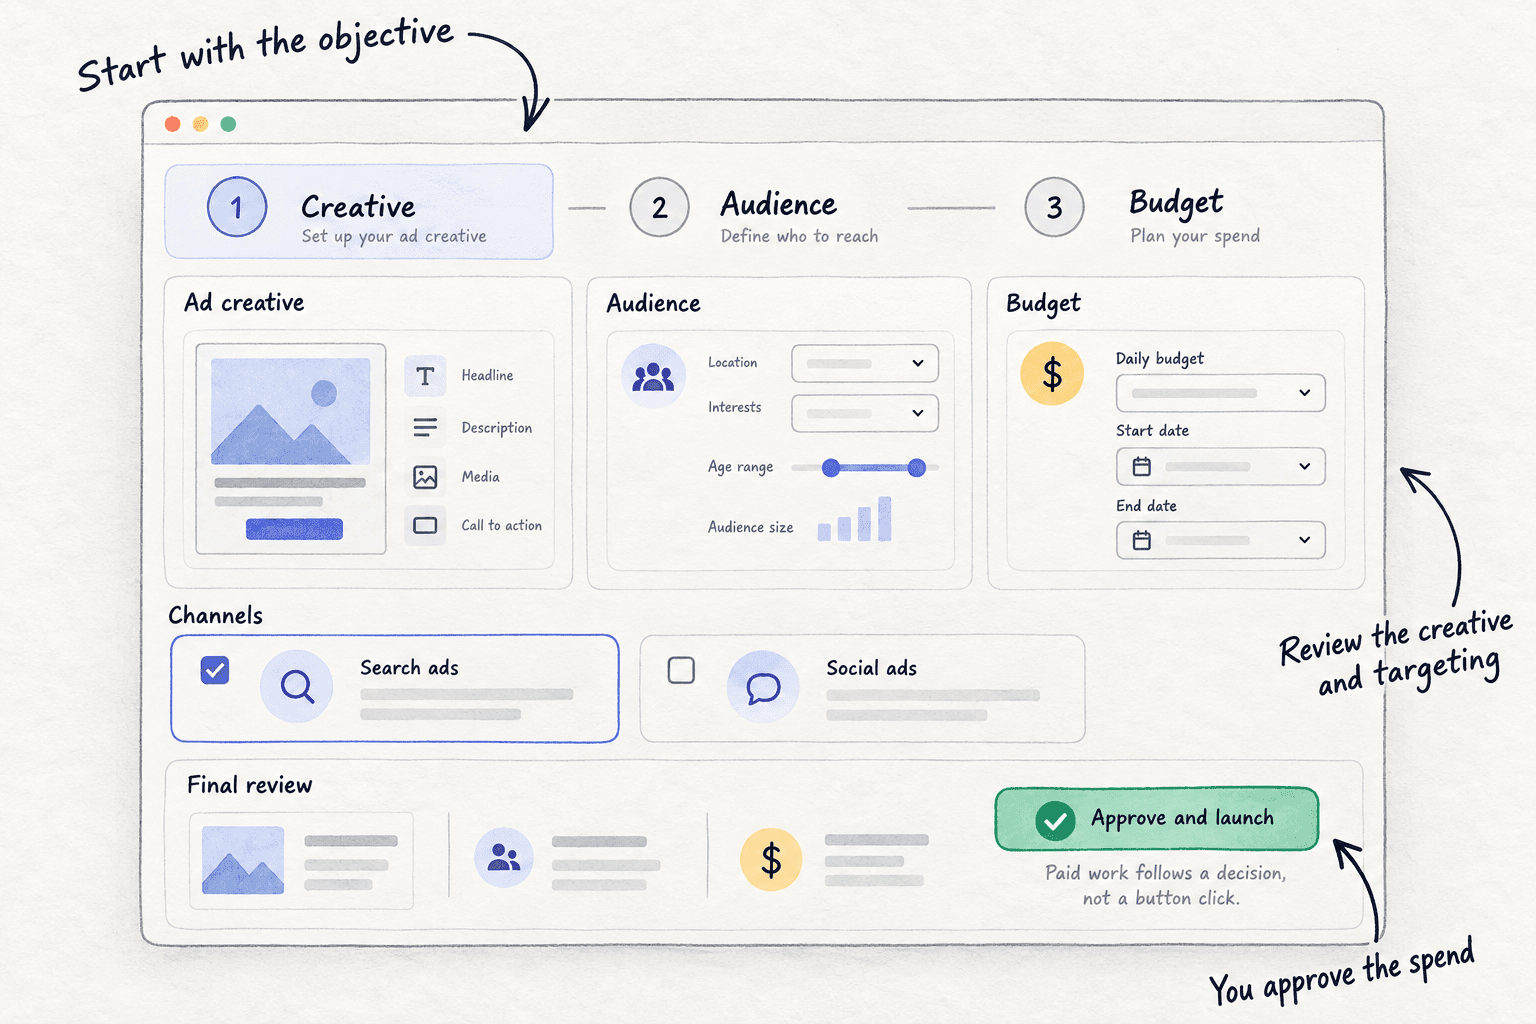
Step 6. Campaign monitoring reports live spend, impressions, clicks and click-through rate for each campaign, and every 12 hours proposes actions, such as which creative to stop. You approve or reject each one. Orders still come from Shopify, so keep your daily row.
Your Meta ads checklist for your first 14-day test
0 of 12 done
Work through this list with an AI assistant
It drafts the work and keeps track of what is done.
Frequently asked questions
- How much should I spend on Meta ads for my Shopify store?
Start with 10 times what one order leaves you, spent over 14 days. If an order leaves $23, test with about $227, roughly $16 a day, and stop any ad that spends $68 with no order. Raise by 20% only when Shopify shows each order cost less than it leaves. How much to spend on ads has the full method.
- Should I use Shopify's Facebook & Instagram app or add the Meta pixel myself?
Use the app. It is free, it adds both the pixel and the Conversions API, and at Maximum data sharing Meta still gets each order when a browser blocks tracking. Adding the pixel by hand as well can count each order twice. Use one way only, then check it with a real test order.
- Why does Meta show more purchases than Shopify?
Meta counts purchases it credits to an ad within its time window, including some from people who only saw the ad. Shopify counts real orders. A gap of 5 to 10% is common. A gap of 20 to 30% usually means a second pixel or duplicate events, so place a test order and check Events Manager shows one purchase, not two.
- Should I start with a Traffic campaign because my pixel has no sales yet?
No. Choose Sales with Purchase as the conversion event from day one. A Traffic campaign finds people who click, not people who buy. Meta's 50-a-week figure is when an ad set leaves learning, not a rule for starting. Your test will show "Learning limited", which Meta says is not a penalty. Judge it on Shopify's orders.
Sources
- 1.Facebook and Instagram by Meta — Shopify Help Center, checked 9 October 2026
- 2.Setting up Facebook and Instagram by Meta — Shopify Help Center, checked 9 October 2026
- 3.Meta customer data sharing — Shopify Help Center, checked 9 October 2026
- 4.Testing orders — Shopify Help Center, checked 9 October 2026
- 5.Conversion summary — Shopify Help Center, checked 9 October 2026
- 6.Marketing reports — Shopify Help Center, checked 9 October 2026
- 7.Viewing marketing performance — Shopify Help Center, checked 9 October 2026
- 8.Session measurement update — Shopify Help Center, September 2026, checked 9 October 2026
- 9.Meta Ads Data Advisor (formerly Meta Pixel Helper) — Meta for Developers, checked 9 October 2026
- 10.Test your server events using the test events tool — Meta Business Help Centre, checked 9 October 2026
- 11.Change the time zone for your ad account — Meta Business Help Centre, checked 9 October 2026
- 12.About Advantage+ audience — Meta Business Help Center, checked 9 October 2026
- 13.About lifetime budgets — Meta Business Help Centre, checked 9 October 2026
- 14.Update an account spending limit — Meta Business Help Centre, checked 9 October 2026
- 15.About ads in review — Meta Business Help Center, checked 9 October 2026
- 16.Last significant edit — Meta Business Help Center, checked 9 October 2026
- 17.About learning limited — Meta Business Help Centre, checked 9 October 2026
- 18.Meta Ads Guide: image ad specs — Meta, checked 9 October 2026
- 19.Meta Ads Guide: Instagram Reels specs and safe zones — Meta, checked 9 October 2026
- 20.Expanding GenAI Transparency for Meta's Ads Products — Meta Newsroom, updated 1 June 2026
- 21.Meta deprecates legacy campaign APIs for Advantage+ structure — PPC Land, 26 October 2025
- 22.Meta rewrites click attribution rules — PPC Land, 4 March 2026
- 23.Meta's Advantage+ settings: why they keep reappearing — JumpFly, 6 August 2026
- 24.How many ad creatives do you need? (quoting Meta's 'About managing ad volume') — Novoads, 1 August 2026
- 25.Facebook Advertising Benchmarks for 2026 — LocaliQ, updated 23 September 2026
- 26.Why do Shopify orders and Meta purchase events never match exactly? — Shopify Community, 3 July 2026
- 27.New Meta pixel with no purchase data: best optimization strategy for a new store? — Shopify Community, 11 July 2026
- 28.Meta Ads purchases not matching Shopify orders — Shopify Community, 3 January 2026, answered 29 August 2026
Next article to read
Related guides
- How to calculate break-even ROASD2CComing soon
- How to set up conversion trackingComing soon
- How to fix ads that get clicks but no salesD2CComing soon
- How much to spend on adsSet your first ad budget from what one sale leaves you: a yes-or-no check by business type, a test limit of 10 times that number over 14 days locked in Google, Meta or LinkedIn, a daily stop line at 3 times, and a Sunday rule to raise 20% or stop.
Guides that link here
- How to choose marketing channels for an ecommerce brandD2C
- How much to spend on marketing as an ecommerce brandD2C
- How to set up Klaviyo flows for a new storeD2C
- How to get your first sales on ShopifyD2C
- How to launch a D2C brandD2C
- How to do a competitor analysis
- How to market a D2C brandD2C
- How to price a productD2C
- How much to spend on ads
- How to find micro-influencers for your brandD2C
- How to get UGC for your brandD2C
- How to get your first product reviewsD2C
- How to make a new store look trustworthyD2C
- How to promote your business on InstagramD2C
- Instagram post ideas for D2C brandsD2C
Cite this page
Dinesh Bypilla (2026). How to run Meta ads for a Shopify store. Scout7 Academy. https://scout7.ai/academy/paid-ads/how-to-run-meta-ads-for-a-shopify-store
Written by Dinesh Bypilla, Agentic systems engineer at Scout7. Reviewed by Murali Sid. Last checked 9 October 2026.
Quote any part of this guide with a link back to this page. © 2026 Scout7.
Markdown version of this page: https://scout7.ai/academy/paid-ads/how-to-run-meta-ads-for-a-shopify-store.md